
I attended a very enjoyable one day wildlife photography course at the Manchester Museum. The teacher was Chris Mattison, a talented and experienced wildlife photographer. The museum has featured in several of my exercises for the AOP, so this seemed like a good opportunity to meet the animals properly and to get some really good shots.
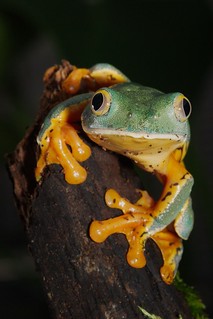
Splendid leaf frog
The course was designed to show twelve keen photographers how best to photograph frogs, although obviously the techniques learned would be useful for many other situations too. We were introduced to the frogs and other animals that are kept at the museum, including some very rare species. It may seem a bit unusual for a museum to keep live animals, but the Manchester Museum has held some animals since at least the 1970s, for conservation and education purposes. The link to the University allows the animals to be studied in detail, which helps improve our understanding of them and can help with the preservation of the animals in the wild.
Before being able to photograph any of the animals we were given some background information on them. It’s really important to know the animals’ behaviour, both to enable us to get some good photographs and so as not to cause any distress to the animals. Obviously, all the animals we met on the day were quite happy to sit around and have flashguns fire at them, but this isn’t the case for all animals. It was also pointed out that frogs are nocturnal, so having a dark background (produced by a strong flash) is perfectly acceptable, but for other animals that only come out during the day, such as butterflies, it can look extremely artificial and inaccurate.
Depth of field for frogs
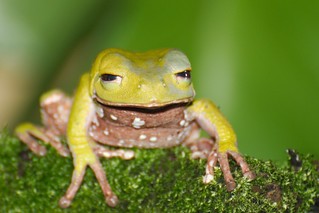 Looking at the results, I found that a photograph worked best when the eyes, nose and front feet of the frog are all in focus. The back of the animal doesn’t matter quite so much – in fact if it’s slightly out of focus it can give the picture some depth. If the front feet are out of focus it can make the animal look like it’s about to jump out of the frame, which can be distracting, but when used carefully can produce a good image. Having the nose out of focus is almost always too distracting though.
Using a small aperture for much of the day really makes me wish I’d cleaned my sensor though!
Choice of lens
The telephoto was okay for whole body shots of the larger animals, but I found that a macro lens was required to pick up more of the amazing fine detail of the animals. Also, I couldn’t hold the telephoto and the flash together, which given as I didn’t take a lighting stand meant I was very limited as to where I could put it and this compromised the shots that I could take. Luckily, some very kind people lent me their macro lenses, which allowed me to get some much better shots and to move the flash around more. It was the first time I’d used a dedicated macro lens and I found them very easy to use. The Sigma one was quite slow to focus, but the picture quality was excellent and I hope to pick one up when I’ve got some more spare cash.
Using flash
I wasn’t expecting flash to be so essential, although with hindsight I should have anticipated that indoor macro photography, which requires very small apertures, would require flash. I was very glad that I put my flashgun and wireless triggers in my bag!
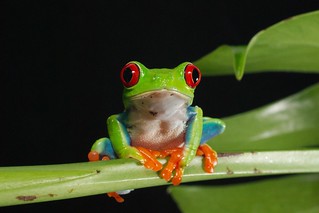
Red-eyed tree frog, with two light set-up
I struggled with the angle of the flash at times. Often direct (on-camera) flash was plenty good enough. Otherwise, I found that 3/4 lighting, with a white reflector/second flash worked very well. The red-eyed tree frogs in particular were photographed with an excellent lighting set-up created by one of the other students. This had two lights at approximately 45 degree angles to the subject, one of which was diffused by an umbrella. In the morning’s talk we were given some alternative lighting examples and I would’ve liked to have been able to try some of these out as well; I’ll keep them in mind for future projects though.
I found myself adding 0.5-1 stop of fill light in post production for many of the images, so I’ll know in future to be more careful about harsh shadows appearing. The better lit photos that I took used a reflector or second light, but that tends to require a stand or an assistant.
Conclusions
It was a really enjoyable day and it was great to meet the animals. However, the course itself felt a bit rushed and it would’ve been useful to spend more time setting up a shot and getting feedback on the images. I’m glad that I’ve studied lighting techniques and how to use my flash during part 4 of the AOP, as this saved a lot of time and enabled me to get better images.
Pre-visualising the end picture, rather than shooting and hoping something great appeared, was very helpful. It usually meant waiting for the animals to be in the correct position, but tended to pay off with better images.
I found that having the correct equipment is essential, especially when there’s little time to set-up or make changes. On camera-flash can work surprisingly well, but a modifier of some sort is recommended to prevent the light from appearing to harsh.
I didn’t get chance to try using my flashgun to provide fill light and haven’t so far in the AOP, but that’s something I would like to try in future as it seems like it could be a very useful technique.
Overall, I met some lovely people and got some really nice photographs. I now know that I can quite comfortably use a macro lens and a flash on or off camera and I’m keen to try this out again in future.

